How to make an educational surgical video in 8 steps
Educational surgical videos have become increasingly popular in recent years to supplement the training of surgical residents. Teaching surgeons, even without any editing background, can produce these educational tools themselves. Who better than the surgeons to chose which part of the procedure to insist on! Here is how do you make an educational surgical video in eight steps.

Break down the editing steps
By following certain steps, creating an educational surgical video becomes easy.
In France and around the world, surgeons undergoing initial or continuing training often watch surgical videos, most often on platforms such as Youtube or Vimeo.
Some patients prepare for their procedure using video content available on Google, even though these educational surgical videos are primarily designed for surgical students and residents.
Making an educational surgical video: presentation
There are many advantages:
- viewable on smartphones anywhere, anytime;
- offer ideal theoretical support to complement the training provided in the operating theatre;
- can be integrated into a university teaching project with surgical simulators or cadaveric dissection;
- enables experienced surgeons to compare practices in different hospitals around the world.
This article is a guide for healthcare professionals: presenting the keys to easily edit from start to finish, while optimising the technical characteristics of the surgical video and respecting medical confidentiality. Some technical terms are used, so don’t hesitate to consult our video editing glossary and technical glossary.
To go further, a number of articles explore specific aspects of video editing, you can read them here.

Fast learning curve
Making an educational surgical video takes time but can be done even by beginners.
Video editing: from beginner to professional
Video acquisition takes place during the surgical procedure, using dedicated surgical equipment (video columns, microscopes, etc.) or an external device (operating theatre camera, frontal camera, etc.). Choosing the best filming system to have the clearest surgical view is crucial.
Different stages in the editing process can be identified. To edit a video smoothly and easily, it’s important to get organised beforehand and to have a clear idea of what needs to be done.
Find out more: Beginner tutorials with DaVinci Resolve
Find out more: Four tips for faster video editing
Stage 1: Prior to editing
First of all, you need to organise your work plan, create a specific folder and organise the various elements into sub-folders – rushes, sounds, graphics, etc.
For the moment, only the raw video files of the procedure exists, but preparing the organisation of the workspace beforehand saves time afterwards.
It is also important to identify the characteristics of the video file (format, bit rate, resolution) and their compatibility with editing software. Sometimes conversion is necessary to optimise the files.
Stage 2: De-rushing
A rush is a raw unedited video file.
In the case of a surgical video, the viewer has a single rush of the surgical procedure, sometimes several hours long and including several pauses (to clean instruments, think, etc.).
The de-rushing stage is the most important : it consists of identifying the points of interest in the video file, trimming it to a much shorter video and deleting unnecessary parts using the editing software.
Ideally, this should be done as soon as possible after the surgery, if possible on the same day, when the intra-operative events and passages of educational interest are still fresh in the memory. This avoids having to watch the whole rush several days later to recall the key passages: this saves a considerable amout of time!
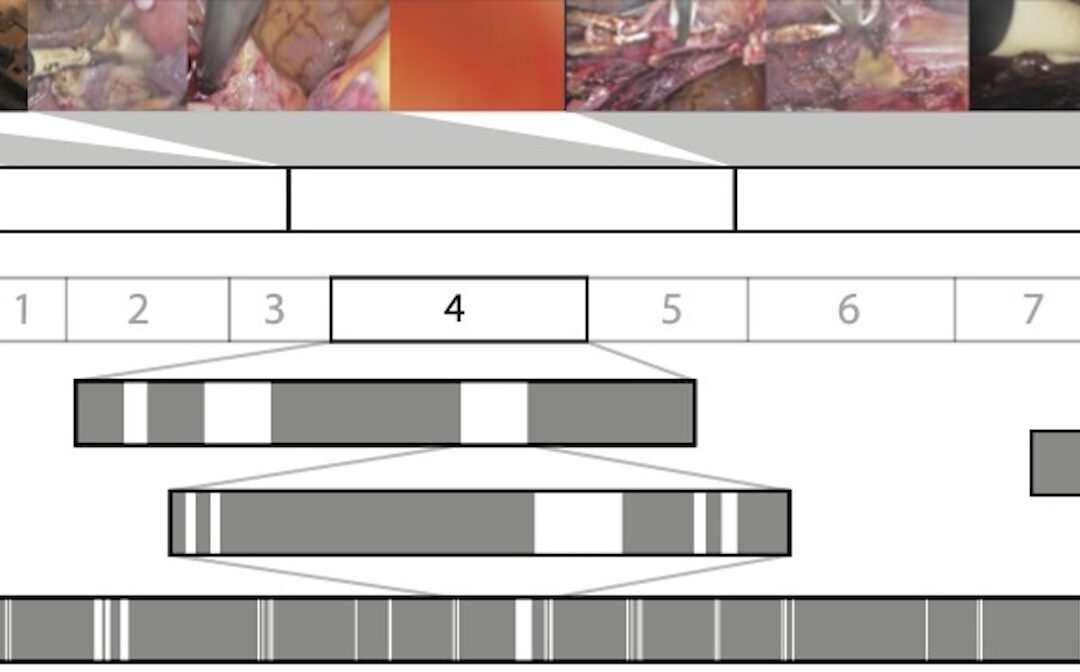
Step 3: Identifying chapters in the video
Next, the aim is to define the video’s educational plan, based on the strategic stages of the procedure. This gives rise to chaptering, highlighted using title inter-screens.
After that, the structure starts to take shape: it’s time to move on to the details.
Step 4: Adjust plan values
Here, zooms and freeze-frames support the educational goal of the video. They are used to clarify and specify the subject, point out a part of the anatomy during the operation, emphasise a particular point of attention…
This step also makes it possible to identify which moments will need to be anonymised in order to make the patient non-identifiable.
Step 5: Graphic elements
Graphic elements will often take the form of arrows and annotations. They provide graphic or textual details of the procedure – anatomy, key gestures, etc. They are often overlays with a transparent background.
There are two ways of proceeding: create the graphic elements directly within the editing software, or prepare them in advance using graphics software, or even PowerPoint and import them into the editing software.
Transitions can also be added between surgical sequences to make the visual rendering smoother, but it is strongly recommended to keep things as simple as possible (a 300ms black fade transition, for example).
The duration graphics and transitions directly affects the tempo of the video, and can make it frustrating if too fast or boring if too slow. There are no strict rules but click here to see our recommendations for surgical videos.
To limit the risk of graphic mistakes, a number of points need to be checked:
- Avoid overexposure, underexposure and oversaturation of the image;
- Choose a font that is simple enough (preferably sans-serif) and colors that are contrasting enough to be readable;
- Avoid colors that are too bright and too contrasting;
- Pay attention to the resolution of the images imported into the project: poor quality or resolution will show up in your editing;
- This is a professionnal format used for surgical education. Keeping transitions to a minimum (or keeping them as simple as possible) will keep attention on the key information and facilitate understanding.
Stage 6: Introduction and conclusion
Now the most important part of the editing is done: the final result is beginning to take shape.
The next step will be to contextualise the surgical procedure, choosing its title (usually the name of the procedure or disease), presenting the case study, adding a conclusion at the end of the video and incorporating institutional logos. This information is presented using fixed text screens, usually created using tools such as PowerPoint or live in the editing software.
Stage 7: Narration
To make it even more educational, it is important to include a voice narration or at least a subtitled narration (ideally both!). For the viewer, it complements the annotations, zooms and freeze-frames. This is an essential step to increase the educational value of the video.
The quality of the audio recording is key, as confusing text or a noisy background strongly impacts the overall quality of the content.
Find out more: The keys to correctly record a voiceover
Find out more: How to create subtitles
Step 8: Export
Once the narration stage is over, the actual editing is complete. It’s time to move on to export, or transforming the edit into a video file that you can use.
When it comes to exporting, editing softwares offer a number of export characteristics: resolution, bitrate, video and audio codecs, etc. These will determine the format, size and audio and video quality of the final file.
When it comes to surgical videos, the technical specifications are often the same.

Broadcast the video
Having made an educational surgical video, the next step is to make it available on the Internet.
After that: publication, distribution and promotion
By following these eight steps, consulting the associated resources if necessary – in particular those of Université Paris Cité – and with a little patience, everyone is capable of completing a video edit in a few days.
The final stage will be to put it online on an institutional or personal website, or on a video platform like Youtube. There are a number of techniques you can use to make the most of your video: creating a thumbnail, choosing a powerful title and description, using relevant keywords (health, medical, operations, hospital, etc.), etc.
And then…
The educational video is ready to watch!
Find out more: How to promote your video to increase the number of viewers
Find out more: Promoting your educational surgical video on social networks
Read more about editing
Surgical Video Summarization: Multifarious Uses, Summarization Process and Ad-Hoc Coordination
While surgical videos are valuable support material for activities around surgery, their summarization demands great amounts of time from surgeons, limiting the production of videos. Through fieldwork, we show current practices around surgical videos. First, we...
Editing surgical videos on your smartphone: pros and cons
Using your smartphone to edit an educational surgical video has its advantages: the softwares are often easy to use, and this method requires no tools other than a smartphone. However, it also has its limitations and is not suitable for all uses. Capcut Capcut,...

Technical norms and guidelines to create subtitles for an educational surgical video
A key educational tool and a way to increase your audience, subtitling is subject to certain standards. Display time, colours, number of characters per line... Here's everything you need to know about effective subtitling. Subtitle alignment Aligned left or centre,...

Subtitles in an educational surgical video: video editing software or Youtube?
Subtitles make a video more accessible, particularly for the hard of hearing, those for who the language used is not the mother-tongue or those who don't have access to sound at the time of viewing. International broadcast Whatever the viewing medium, the ability to...